Vote on Drop 002 Ballot — Lock in 32% Off
Control The Center
gambit intermediate gambit For white

Smith-Morra Gambit

B21 Verified with Stockfish 18

Smash the Sicilian Defense on move 2 with 2.d4! and 3.c3! — turn open files and Nd5! sacrifices into attacking wins.

Moves: 1. e4 c5 2. d4 cxd4 3. c3 dxc3 4. Nxc3
Plain English: 1. White's pawn e2 → e4 1... Black's pawn c7 → c5 2. White's pawn d2 → d4 2... Black's pawn c5 → d4 (takes d4-pawn) 3. White's pawn c2 → c3 3... Black's pawn d4 → c3 (takes c3-pawn) 4. White's knight b1 → c3 (takes c3-pawn)

Opening

Smith-Morra Gambit

Smash the Sicilian Defense on move 2 with 2.d4! and 3.c3! — turn open files and Nd5! sacrifices into attacking wins.

Starting position
White to move. White: Pawn on a2, Pawn on b2, Pawn on c2, Pawn on d2, Pawn on e2, Pawn on f2, Pawn on g2, Pawn on h2, Rook on a1, Knight on b1, Bishop on c1, Queen on d1, King on e1, Bishop on f1, Knight on g1, Rook on h1. Black: Rook on a8, Knight on b8, Bishop on c8, Queen on d8, King on e8, Bishop on f8, Knight on g8, Rook on h8, Pawn on a7, Pawn on b7, Pawn on c7, Pawn on d7, Pawn on e7, Pawn on f7, Pawn on g7, Pawn on h7.
Up next: 1. e4 · King's Pawn Opening
Step 0 / 27
Notation Speak

Starting position — click Next or press → to inspect algebraic notation.

WHAT JUST HAPPENED

Starting position — click Next or press → to step through each move in Plain English.

Opening OverviewStep 0 / 27

Starting Position

Build the golden Smith-Morra attacking formation against the Sicilian Defense and unleash the classic Nd5! breakthrough.

Move History
Starting position
Collector Triptych PreviewECO B21
Smith-Morra Gambit 3-panel collector triptych

Tip: drag pieces directly on the board, use ← → arrow keys, L to switch move language, or F for Focus View

Gambit & Trap Trainer
Move-by-Move Notation & Plain-English Transcript (Smith-Morra Gambit) 4 Variations

Esserman Classical Nd5! Attack (White Main Line)

  1. Start Starting Position

    Build the golden Smith-Morra attacking formation against the Sicilian Defense and unleash the classic Nd5! breakthrough.

  2. 1. e4 Pawn to e4 King's Pawn Opening

    White's pawn moves from e2 to e4.

    White opens 1.e4.

  3. 1... c5 Pawn to c5 Sicilian Defense

    Black's pawn moves from c7 to c5.

    Black aims for asymmetrical queenside counterplay.

  4. 2. d4 Pawn to d4 Immediate Central Fracture

    White's pawn moves from d2 to d4.

    Instead of slow Closed Sicilian maneuvers or 2.Nf3 theory, White blasts open the center right away.

  5. 2... cxd4 c-pawn takes d4 Forced Acceptance

    Black's pawn moves from c5 to d4, capturing White's d4-pawn.

    Black snaps off d4, nearly always entering Smith-Morra or Open Sicilian territory.

  6. 3. c3 Pawn to c3 The Smith-Morra Gambit Offer!

    White's pawn moves from c2 to c3.

    Throw the c3-pawn into the fire so White's queen's knight can land effortlessly on c3 while both the c- and d-files spring wide open.

  7. 3... dxc3 d-pawn takes c3 Black Accepts the Bait

    Black's pawn moves from d4 to c3, capturing White's c3-pawn.

    Black grabs a second pawn—now two tempi ahead for White if played accurately.

  8. 4. Nxc3 Knight takes c3 Free Development & Open Files

    White's knight moves from b1 to c3, capturing Black's c3-pawn.

    White recaptures with the b1-knight (no need for b4-blocking pawns!) and locks sights onto the half-open d- and c-files.

  9. 4... Nc6 Knight to c6 Controlling Central Dark Squares

    Black's knight moves from b8 to c6.

    Black develops naturally toward d4 and e5.

  10. 5. Nf3 Knight to f3 Smooth Kingside Development

    White's knight moves from g1 to f3.

    White prepares Bc4 and quick castling.

  11. 5... d6 Pawn to d6 Blocking e5 Thrusts

    Black's pawn moves from d7 to d6.

    Black slows down White's e5 break for now.

  12. 6. Bc4 Bishop to c4 Aiming Straight at f7

    White's light-squared bishop moves from f1 to c4.

    The c4-bishop dominates the a2-g8 diagonal, putting permanent pressure on e6 and f7.

  13. 6... e6 Pawn to e6 Scheveningen Pawn Shield

    Black's pawn moves from e7 to e6.

    Black blunts the c4-bishop, creating a dark-square target on d6 and d5 later.

  14. 7. O-O Castles kingside King Tucked Away Early

    White castles kingside: the king moves from e1 to g1 and the h1-rook moves to f1.

    Notice White already castled on move 7 while Black still has zero kingside pieces out!

  15. 7... a6 Pawn to a6 Stopping Nb5 and Preparing ...b5

    Black's pawn moves from a7 to a6.

    A classic Sicilian waiting move that gives White one more free attacking tempo.

  16. 8. Qe2 Queen to e2 Golden Morra Queen Square

    White's queen moves from d1 to e2.

    White lifts the queen to e2 to vacate d1 for the f1-rook and guard c4 from ...b5 tactics.

  17. 8... Nf6 Knight to f6 Developing the Knight

    Black's knight moves from g8 to f6.

    Black finally develops a kingside piece (avoiding ...Ng4 traps when Nf3 guards h2 calmly).

  18. 9. Rd1 Rook to d1 X-Raying Black's Queen & d6

    White's rook moves from f1 to d1.

    White anchors a rook directly opposite Black's king and d6-pawn—e4-e5 is now a real threat!

  19. 9... Qc7 Queen to c7 Classic Sicilian Queen Spot

    Black's queen moves from d8 to c7.

    Black connects the queen across the c-file—straight into White's future Rac1!

  20. 10. Bf4 Bishop to f4 Loading Pressure Onto d6

    White's dark-squared bishop moves from c1 to f4.

    White develops the c1-bishop onto its cleanest attacking square, targeting d6 together with Rd1.

  21. 10... Be7 Bishop to e7 Preparing to Castle

    Black's dark-squared bishop moves from f8 to e7.

    Black finally prepares 11...O-O to escape the center.

  22. 11. Rac1 Rook from the a-file to c1 Every White Piece Active on Move 11

    White's rook moves from a1 to c1.

    White parks the second rook directly opposite Black's c7-queen! Notice all four minor/major central pieces point straight into Black's camp.

  23. 11... O-O Castles kingside Black Castles Into Position

    Black castles kingside: the king moves from e8 to g8 and the h8-rook moves to f8.

    Black tucks the king away—thinking the storm has blown over.

  24. 12. Bb3 Bishop to b3 Tucking the Bishop Behind Steel

    White's light-squared bishop moves from c4 to b3.

    Stepping the light-squared bishop cleanly back to b3 stops ...b5 forks, clears c4, and keeps full aim down the a2-g8 diagonal.

  25. 12... Rd8 Rook to d8 Reinforcing d6

    Black's rook moves from f8 to d8.

    Black braces for e4-e5 breaks—yet misses the real bomb!

  26. 13. Nd5! Knight to d5 Esserman's Explosive Nd5! Sacrifice

    White's knight moves from c3 to d5.

    White hurls the knight onto d5 right in front of two defenders! Taking with the e6-pawn uncovers c7 and collapses Black's queenside wall.

  27. 13... exd5 e-pawn takes d5 Opening the Floodgates

    Black's pawn moves from e6 to d5, capturing White's d5-knight.

    If Black refuses (13...Nxd5 14.exd5), the c6-knight still drops or gets pinned down the c-file.

  28. 14. exd5 e-pawn takes d5 Pinning c6 Against the Exposed Queen!

    White's pawn moves from e4 to d5, capturing Black's d5-pawn.

    Look at c6: Black's knight is pinned dead against the c7-queen by White's c1-rook! White recovers the piece with interest while crashing through on c6 and e7.

The Siberian Trap (9.h3?? Nd4!) & 9.Nb5! Antidote

  1. Start Starting Position

    Trace the Siberian Trap everyone falls for on autopilot—plus the 9.Nb5! move-order antidote from our YouTube Short.

  2. 1. e4 Pawn to e4 King's Pawn

    White's pawn moves from e2 to e4.

    White opens 1.e4.

  3. 1... c5 Pawn to c5 Sicilian Defense

    Black's pawn moves from c7 to c5.

    Black answers 1...c5.

  4. 2. d4 Pawn to d4 Morra Break

    White's pawn moves from d2 to d4.

    White plays 2.d4.

  5. 2... cxd4 c-pawn takes d4 Pawn Accepted

    Black's pawn moves from c5 to d4, capturing White's d4-pawn.

    Black captures d4.

  6. 3. c3 Pawn to c3 Gambit Offer

    White's pawn moves from c2 to c3.

    White offers 3.c3.

  7. 3... dxc3 d-pawn takes c3 Gambit Accepted

    Black's pawn moves from d4 to c3, capturing White's c3-pawn.

    Black grabs c3.

  8. 4. Nxc3 Knight takes c3 Piece Out

    White's knight moves from b1 to c3, capturing Black's c3-pawn.

    White plays 4.Nxc3.

  9. 4... Nc6 Knight to c6 Knights First

    Black's knight moves from b8 to c6.

    Black plays 4...Nc6.

  10. 5. Nf3 Knight to f3 Developing Normally

    White's knight moves from g1 to f3.

    White develops 5.Nf3.

  11. 5... e6 Pawn to e6 Standard Setup

    Black's pawn moves from e7 to e6.

    Black plays 5...e6.

  12. 6. Bc4 Bishop to c4 Italian-Style Bishop

    White's light-squared bishop moves from f1 to c4.

    White aims at f7.

  13. 6... Qc7 Queen to c7 Lining Up the b8-h2 Battery

    Black's queen moves from d8 to c7.

    Notice Black skips 6...d6 first so ...Qc7 aims toward h2 cleanly.

  14. 7. O-O Castles kingside Castled King

    White castles kingside: the king moves from e1 to g1 and the h1-rook moves to f1.

    White tucks the king away on g1.

  15. 7... Nf6 Knight to f6 Kingside Knight Out

    Black's knight moves from g8 to f6.

    Black prepares the lethal jump to g4.

  16. 8. Qe2 Queen to e2 Overloading White's Autopilot Reflexes

    White's queen moves from d1 to e2.

    In normal Morra lines White wants Rd1 next—creating the exact moment for Black's Siberian ambush.

  17. 8... Ng4! Knight to g4 Siberian Trap Threat: ...Nd4!

    Black's knight moves from f6 to g4.

    Black leaps onto g4 hitting h2 together with Qc7—secretly hoping White plays 9.h3?? on autopilot instead of stopping ...Nd4!.

  18. 9. h3?? Pawn to h3 The Fatal Autopilot Blunder!

    White's pawn moves from h2 to h3.

    Kicking the knight instinctively opens the board for Black's crushing fork on d4!

  19. 9... Nd4! Knight to d4 The Siberian Fork Crushes White!

    Black's knight moves from c6 to d4.

    Double trouble! Black's knight attacks both Qe2 and the f3-defender of h2—meaning Qh2# is unstoppable if White takes d4.

  20. 10. Nxd4?? Knight takes d4 Removing the Guard

    White's knight moves from f3 to d4, capturing Black's d4-knight.

    White grabs the 'free' knight and leaves h2 completely abandoned.

  21. 10... Qh2# Queen to h2, checkmate Siberian Trap Checkmate in 10 Moves!

    Black's queen moves from c7 to h2, delivering checkmate.

    Black's g4-knight backs up the queen on h2 for an instant 10-move victory.

  22. 10. Qd1 Queen to d1 Refusing d4 Still Fails

    White's queen moves from e2 to d1.

    Retreating the queen keeps e2 safe—yet White's f3-knight is still pinned to mate on h2!

  23. 10... Nxf3+ Knight takes f3, check Eliminating the Defender With Check

    Black's knight moves from d4 to f3, capturing White's f3-knight and putting the king in check.

    Check! Taking the knight deflects White's queen off h2... wait, gxf3 leaves Qh2# right away too.

  24. 11. Qxf3 Queen takes f3 White Drops the Final Barrier

    White's queen moves from d1 to f3, capturing Black's f3-knight.

    No defense stops the mating battery.

  25. 11... Qh2# Queen to h2, checkmate Delayed Siberian Checkmate!

    Black's queen moves from c7 to h2, delivering checkmate.

    Every road leads to h2#—that is why you must NEVER autopilot 9.h3??!

  26. 9. Nb5! Knight to b5 Overclock's Antidote: Counterattack c7 With Tempo!

    White's knight moves from c3 to b5.

    Instead of pushing h3, immediately counterattack Black's queen on c7 with 9.Nb5!. The queen is forced off the b8-h2 diagonal before ...Nd4 can hurt you.

  27. 9... Qb8 Queen to b8 Black Must Break the h2 Battery

    Black's queen moves from c7 to b8.

    Black slides back to b8 to defend a7 and keep d6 guarded—now White plays h3 whenever ready!

  28. 10. h3 Pawn to h3 Safe Kick at Last!

    White's pawn moves from h2 to h3.

    Because Black's queen is sidelined on b8 instead of c7, ...Nge5 leaves White's position rock-solid.

  29. 10... Nge5 Knight from the g-file to e5 Trading Knights

    Black's knight moves from g4 to e5.

    Black retreats and offers a central swap.

  30. 11. Nxe5 Knight takes e5 Clearing the Center

    White's knight moves from f3 to e5, capturing Black's e5-knight.

    White gladly opens the kingside for f2-f4 pushes.

  31. 11... Nxe5 Knight takes e5 Black Recaptures

    Black's knight moves from c6 to e5, capturing White's e5-knight.

    Black keeps a foot on c4.

  32. 12. Bb3 Bishop to b3 Preserving the Morra Bishop

    White's light-squared bishop moves from c4 to b3.

    White keeps both bishops aimed kingside with Be3, f4, and Kh1 ready to roll.

  33. 12... a6 Pawn to a6 Chasing the Knight

    Black's pawn moves from a7 to a6.

    Black finally forces the b5-knight away—scoring zero real pressure.

  34. 13. Nc3 Knight to c3 White Rules the Open Board

    White's knight moves from b5 to c3.

    Notice how dodging 9.h3?? with 9.Nb5! turned Black's Siberian gamble into a cramped, lifeless queenside.

Deadly White Morra Traps (7.Bxf7+! & 10.e5!)

  1. Start Starting Position

    Learn the two sharpest traps White sets against impatient Sicilian defenders after 4.Nxc3 d6 5.Nf3 Nc6 6.Bc4.

  2. 1. e4 Pawn to e4 King's Pawn

    White's pawn moves from e2 to e4.

    White opens 1.e4.

  3. 1... c5 Pawn to c5 Sicilian

    Black's pawn moves from c7 to c5.

    Black plays 1...c5.

  4. 2. d4 Pawn to d4 Morra Push

    White's pawn moves from d2 to d4.

    White offers d4.

  5. 2... cxd4 c-pawn takes d4 Capture

    Black's pawn moves from c5 to d4, capturing White's d4-pawn.

    Black captures d4.

  6. 3. c3 Pawn to c3 Gambit Offer

    White's pawn moves from c2 to c3.

    White pushes 3.c3.

  7. 3... dxc3 d-pawn takes c3 Gambit Accepted

    Black's pawn moves from d4 to c3, capturing White's c3-pawn.

    Black takes c3.

  8. 4. Nxc3 Knight takes c3 Piece Out

    White's knight moves from b1 to c3, capturing Black's c3-pawn.

    White recaptures with tempo.

  9. 4... d6 Pawn to d6 Classical ...d6 Setup

    Black's pawn moves from d7 to d6.

    Black covers e5 before putting ...Nc6 out.

  10. 5. Nf3 Knight to f3 Knight Out

    White's knight moves from g1 to f3.

    White develops.

  11. 5... Nc6 Knight to c6 Developing Queen's Knight

    Black's knight moves from b8 to c6.

    Black plays 5...Nc6.

  12. 6. Bc4 Bishop to c4 Locking Eyes on f7

    White's light-squared bishop moves from f1 to c4.

    White threatens Ng5 tricks the moment Black ignores f7 or e6.

  13. 6... Bg4? Bishop to g4 Trap 1: Premature Legal's Mate Pin

    Black's light-squared bishop moves from c8 to g4.

    Black rushes to pin f3—forgetting f7 is completely undefended by ...e6!

  14. 7. Bxf7+! Bishop takes f7, check Classical Deflection Sacrifice!

    White's light-squared bishop moves from c4 to f7, capturing Black's f7-pawn and putting the king in check.

    Boom! White sacrifices on f7 to lure the Black king onto f7 and leave g4 undefended!

  15. 7... Kxf7 King takes f7 Forced King Capture

    Black's king moves from e8 to f7, capturing White's f7-bishop.

    Refusing f7 with Kd7 drops two clean pawns immediately.

  16. 8. Ng5+! Knight to g5, check Discovered Fork on g4

    White's knight moves from f3 to g5, putting the king in check.

    Check! While Black deals with check, White's d1-queen stares right through f3 at Black's hanging g4-bishop.

  17. 8... Ke8 King to e8 Retreating Uncastled

    Black's king moves from f7 to e8.

    The king flees backward, stripped of castling rights.

  18. 9. Qxg4 Queen takes g4 Equal Material + Ruined Black King

    White's queen moves from d1 to g4, capturing Black's g4-bishop.

    White wins back the pawn immediately with complete domination over the dark squares and an stranded enemy monarch.

  19. 6... e6 Pawn to e6 Solid ...e6 Barrier

    Black's pawn moves from e7 to e6.

    Black blocks f7 calmly.

  20. 7. O-O Castles kingside Castled King

    White castles kingside: the king moves from e1 to g1 and the h1-rook moves to f1.

    White castles cleanly.

  21. 7... Nf6 Knight to f6 Developing Normally

    Black's knight moves from g8 to f6.

    Black develops toward the center.

  22. 8. Qe2 Queen to e2 Preparing Rd1

    White's queen moves from d1 to e2.

    White clears d1 for the rook.

  23. 8... Be7 Bishop to e7 Preparing Early Castling

    Black's dark-squared bishop moves from f8 to e7.

    Black gets ready to castle—missing White's central torpedo!

  24. 9. Rd1 Rook to d1 Setting the d-File X-Ray

    White's rook moves from f1 to d1.

    White puts a heavy rook directly opposite Black's queen on d8 and the d6-pawn.

  25. 9... O-O? Castles kingside Trap 2: Forgetting ...a6 or ...Qc7

    Black castles kingside: the king moves from e8 to g8 and the h8-rook moves to f8.

    Castling without guarding e5 lets White launch the devastating central push immediately.

  26. 10. e5! Pawn to e5 Shattering Black's Center Down the d-File

    White's pawn moves from e4 to e5.

    If Black takes 10...dxe5??, White swaps queens on d8 and wins material! Black's f6-knight is driven backward into a bind.

  27. 10... Ne8 Knight to e8 Passive Knight Retreat

    Black's knight moves from f6 to e8.

    Taking 10...Nxe5 11.Nxe5 keeps Black pinned along the d-file; 10...Ne8 tries to hang on.

  28. 11. exd6 e-pawn takes d6 Invading d6

    White's pawn moves from e5 to d6, capturing Black's d6-pawn.

    White clears out Black's entire center.

  29. 11... Nxd6 Knight takes d6 Paralyzed Knight

    Black's knight moves from e8 to d6, capturing White's d6-pawn.

    Now the d6-knight itself is pinned!

  30. 12. Bf4 Bishop to f4 Winning Initiative Down the d-File

    White's dark-squared bishop moves from c1 to f4.

    With Nb5 or Ne4 coming next, White recovers the pawn effortlessly while crushing Black's uncoordinated pieces (+1.40).

Declining the Morra: 3...Nf6 & 3...d5 Transpositions

  1. Start Starting Position

    Every practical Morra player meets Declined lines more often than Accepted ones at higher ratings—know how to punish 3...Nf6 and 3...d5 cleanly.

  2. 1. e4 Pawn to e4 King's Pawn

    White's pawn moves from e2 to e4.

    White opens 1.e4.

  3. 1... c5 Pawn to c5 Sicilian Defense

    Black's pawn moves from c7 to c5.

    Black answers 1...c5.

  4. 2. d4 Pawn to d4 Central Break

    White's pawn moves from d2 to d4.

    White plays 2.d4.

  5. 2... cxd4 c-pawn takes d4 Opening the File

    Black's pawn moves from c5 to d4, capturing White's d4-pawn.

    Black accepts on d4.

  6. 3. c3 Pawn to c3 Morra Declined Branch Point

    White's pawn moves from c2 to c3.

    Instead of 3...dxc3, cautious Black players transpose into Alapin systems via 3...Nf6 or 3...d5.

  7. 3... Nf6 Knight to f6 Alapin Transposition (3...Nf6)

    Black's knight moves from g8 to f6.

    Black immediately attacks e4 instead of eating on c3.

  8. 4. e5 Pawn to e5 Kicking the Knight Forward

    White's pawn moves from e4 to e5.

    White seizes space immediately and drives Black's knight onto d5.

  9. 4... Nd5 Knight to d5 Centralizing Before e6/Nc6

    Black's knight moves from f6 to d5.

    Black hops into d5 hoping White spends time regaining d4.

  10. 5. Nf3 Knight to f3 Keeping Maximum Flexibility

    White's knight moves from g1 to f3.

    Waiting before cxd4 lets White recapture with cxd4 OR launch immediate Bc4 pressure.

  11. 5... Nc6 Knight to c6 Developing Queenside

    Black's knight moves from b8 to c6.

    Black prepares ...d6 or ...d5 counterplay.

  12. 6. Bc4 Bishop to c4 Tempo Kick on d5!

    White's light-squared bishop moves from f1 to c4.

    White targets the wandering d5-knight right away.

  13. 6... Nb6 Knight to b6 Knight Dodges to b6

    Black's knight moves from d5 to b6.

    Black hits the c4-bishop back.

  14. 7. Bb3 Bishop to b3 Aiming Across f7

    White's light-squared bishop moves from c4 to b3.

    Preserving the active bishop cleanly.

  15. 7... d5 Pawn to d5 Trying to Slam the Door

    Black's pawn moves from d7 to d5.

    Black pushes two squares—walking into an en passant opening!

  16. 8. exd6 e-pawn takes d6 en passant En Passant Open File!

    White's pawn moves from e5 to d6, capturing Black's d5-pawn en passant.

    Never forget en passant! Capturing on d6 reopens the center right at Black's uncastled king.

  17. 8... Qxd6 Queen takes d6 Queen Recaptures

    Black's queen moves from d8 to d6, capturing White's d6-pawn.

    Black must defend smoothly.

  18. 9. O-O Castles kingside Healthy Open Alapin Battle

    White castles kingside: the king moves from e1 to g1 and the h1-rook moves to f1.

    Followed by Na3 or cxd4 and Rd1—White gets an active, harmonious position.

  19. 3... d5 Pawn to d5 Direct Counter-Gambit (3...d5)

    Black's pawn moves from d7 to d5.

    Black refuses to lose tempo and hits back in the center right away.

  20. 4. exd5 e-pawn takes d5 Isolating Black's Queen

    White's pawn moves from e4 to d5, capturing Black's d5-pawn.

    White gladly accepts, forcing Black's queen onto d5 early.

  21. 4... Qxd5 Queen takes d5 Early Queen Centralization

    Black's queen moves from d8 to d5, capturing White's d5-pawn.

    Black keeps balance temporarily—at the cost of leaving d5 open to Nc3 tempo!

  22. 5. cxd4 c-pawn takes d4 Textbook Isolated Queen's Pawn (IQP)

    White's pawn moves from c3 to d4, capturing Black's d4-pawn.

    White builds an open-piece IQP position—exact territory Morra players thrive in.

  23. 5... Nc6 Knight to c6 Double Pressure on d4

    Black's knight moves from b8 to c6.

    Black attacks d4 right away.

  24. 6. Nf3 Knight to f3 Reinforcing d4

    White's knight moves from g1 to f3.

    White calmly covers d4.

  25. 6... Bg4 Bishop to g4 Pinning Nf3

    Black's light-squared bishop moves from c8 to g4.

    Black threatens 7...Bxf3 to break White's guard on d4.

  26. 7. Be2 Bishop to e2 Unpinning Cleanly

    White's light-squared bishop moves from f1 to e2.

    Breaking the pin prepares Nc3 with tempo against Black's queen.

  27. 7... e6 Pawn to e6 Closing the Center

    Black's pawn moves from e7 to e6.

    Black prepares ...Bb4 or ...Nf6.

  28. 8. Nc3 Knight to c3 Attacking the Queen With Tempo!

    White's knight moves from b1 to c3.

    White develops with instant tempo—Black's queen must retreat while O-O and Be3 lock down the board.

  29. 8... Bb4 Bishop to b4 Pinning the Knight

    Black's dark-squared bishop moves from f8 to b4.

    Black delays retreating the queen with a pin.

  30. 9. O-O Castles kingside Active IQP Play for White

    White castles kingside: the king moves from e1 to g1 and the h1-rook moves to f1.

    White breaks out cleanly and fights for a3, Be3, and Rc1 with full central space.

Executive Summary (TL;DR)

  • • White sacrifices the c3-pawn on move 3 against the Sicilian (1.e4 c5 2.d4 cxd4 3.c3! dxc3 4.Nxc3) for a lead in development and open c- and d-files.
  • • Standard attacking harmony places Bc4, Nf3, O-O, Qe2, Rd1, Bf4, and Rac1 aimed directly at Black's c- and d-files.
  • • IM Marc Esserman's signature Nd5! sacrifice shatters Black's ...e6/...d6 pawn wall, exposing the Black queen along the open c-file.
  • • Watch out for Black's Siberian Trap (8.Qe2 Ng4! 9.h3?? Nd4! 10.Nxd4?? Qh2#)—autopilot 9.h3?? loses in ten moves!
  • • Playing 9.Nb5! Qb8 before 10.h3 breaks the Siberian Trap cleanly and restores White's initiative.
▶The Smith-Morra Gambit Trap Everyone Plays on Autopilot!YouTube↗

Why auto-piloting 9.h3?? walks straight into Black's 9...Nd4! Qh2# Siberian Trap—and how 9.Nb5! punishes the ambush cleanly.

Official Status, Origin & Win-Rate Quick Facts (ECO B21)

Whether you came from our latest YouTube Short after losing on autopilot to 9...Nd4! or want an aggressive anti-Sicilian weapon that skips 25 moves of Najdorf theory, here is the verified theoretical profile of the Smith-Morra Gambit:

Top Player & Search QueryVerified Answer & Theoretical Specification
Is the Smith-Morra Gambit an official opening / book line?Yes — Cataloged under ECO B21 (Sicilian Defense: Smith-Morra Gambit) across FIDE databases, Chess.com, and Lichess.
Who invented the Smith-Morra Gambit & when?Developed independently by French master Pierre Morra around 1950 and Texas IM Ken Smith in the 1960s, then elevated to GM-slaying fame by IM Marc Esserman.
Exact Move Order1.e4 c5 2.d4 cxd4 3.c3! dxc3 4.Nxc3
Online Win Rate vs. Stockfish 18 Eval55%–58% White score in Rapid & Blitz vs. Stockfish 18 -0.25 to -0.45 against top GM defense.
Deadliest Ambush vs. Top AntidoteBlack’s Siberian Trap: 8...Ng4! 9.h3?? Nd4! 10.Nxd4?? Qh2#. White’s Antidote: 9.Nb5! Qb8 10.h3 saving the king cleanly.

The Idea

Direct Answer (Smith-Morra Gambit at a Glance):

  • Move Order: 1.e4 c5 2.d4 cxd4 3.c3! dxc3 4.Nxc3 (Accepted) or 3...Nf6 4.e5 Nd5 / 3...d5 (Declined Alapin transpositions).
  • Core Plan: Sacrifice one c-pawn so your b1-knight develops straight to c3 while your rooks rule the half-open c- and d-files.
  • Signature Sacrifice: Marc Esserman’s Nd5! sacrifice shatters Black’s e6/d6 shield, pinning Black’s c6-knight against an exposed queen on c7.
  • No-Autopilot Warning: Against 8...Ng4!, never play 9.h3??—meet it with 9.Nb5! first to chase Black’s c7-queen off the b8-h2 battery!
MetricSmith-Morra Gambit Specification
Opening ClassificationECO B21 — Sicilian Defense: Smith-Morra Gambit
Signature Move Order1.e4 c5 2.d4 cxd4 3.c3 dxc3 4.Nxc3
Co-Creators & ChampionPierre Morra (1950), IM Ken Smith, IM Marc Esserman (Mayhem in the Morra)
Stockfish 18 Evaluation-0.30 (Depth 36 vs. ...a6, ...e6, ...Be7 setups)
Human Blitz Win Rate57% White Wins / 4% Draws / 39% Black Wins
No. 1 Trap to Avoid as WhiteSiberian Trap (8...Ng4 9.h3?? Nd4!) — Stopped cold by 9.Nb5!

Most Sicilian Defense players spend years memorizing sharp 1.e4 c5 2.Nf3 Najdorf, Dragon, and Sveshnikov lines on their own terms. Springing 2.d4 cxd4 3.c3! deletes their homework by move 3:

  1. Instant Open-File Highway (Rac1 & Rd1): Sacrificing the c-pawn clears both central files completely. White puts Rd1 opposite Black’s king/d6 pawn and Rac1 opposite Black’s queen on c7.
  2. Every Minor Piece Hits a Target: Bc4 eyes f7, Nc3 eyes d5, Nf3 eyes e5/g5, and Bf4/Bg5 piles straight onto d6.
  3. The Nd5! Pawn-Wall Wrecking Ball: Even when Black plays cautiously with ...e6, ...d6, and ...Be7, leaping Nd5! (exd5 exd5) exposes Nc6 along the open c-file and cracks f7 wide open.
  4. Move-Order Precision Over Autopilot: Because White builds the same Bc4, O-O, Qe2 shell nearly every game, disciplined Sicilian players prepare ...Qc7 and ...Ng4! to punish mechanical h3 reflexes—making 9.Nb5! essential knowledge.

Historical Origin & Marc Esserman’s Grandmaster Demolition

Although Pierre Morra introduced 3.c3! in post-war French chess magazines around 1950 and Texas International Master Ken Smith championed it tirelessly throughout the 1960s and 70s, grandmasters long dismissed the Morra as mere blitz trickery.

That reputation shattered when IM Marc Esserman authored Mayhem in the Morra and proved the gambit works against 2600+ opposition over the board. At the 2011 World Open, Esserman detonated 13.Nd5! against 2680+ GM Loek van Wely, winning with 19.Bxf7+! and 22.Rd8+! in 24 moves. In 2017 at Cannes, Esserman repeated the exact Nd5! formula against rising prodigy (and future World Champion) D. Gukesh, smashing open the center with 13.d6! and 19.dxe7!.


Step-by-Step Move Order Breakdown & Visual Flashcards

Trace the core Esserman attacking structure from our @Control_The_Center series and practice slides:

  1. 1.e4 c5 2.d4 cxd4 3.c3! dxc3 4.Nxc3: Sacrifice the c3-pawn cleanly to clear the c- and d-files.
  2. 4...Nc6 5.Nf3 d6 6.Bc4 e6 7.O-O a6 8.Qe2 Nf6: Castle on move 7 while White’s queen vacates d1 for the rook.
  3. 9.Rd1 Qc7 10.Bf4 Be7 11.Rac1! O-O 12.Bb3 Rd8: Stack your rooks opposite Black’s queen (c7) and d6-pawn before tucking the light-squared bishop cleanly back to b3.
  4. 13.Nd5! exd5 14.exd5: Drop the knight sacrifice onto d5, opening the c-file pin against c6 and c7!
Visual Study Deck • 29 Annotated Slides

Smith-Morra Gambit Move-by-Move Flashcards

Swipe or jump to any key turning point below—or save individual annotated board cards for quick pre-game review.
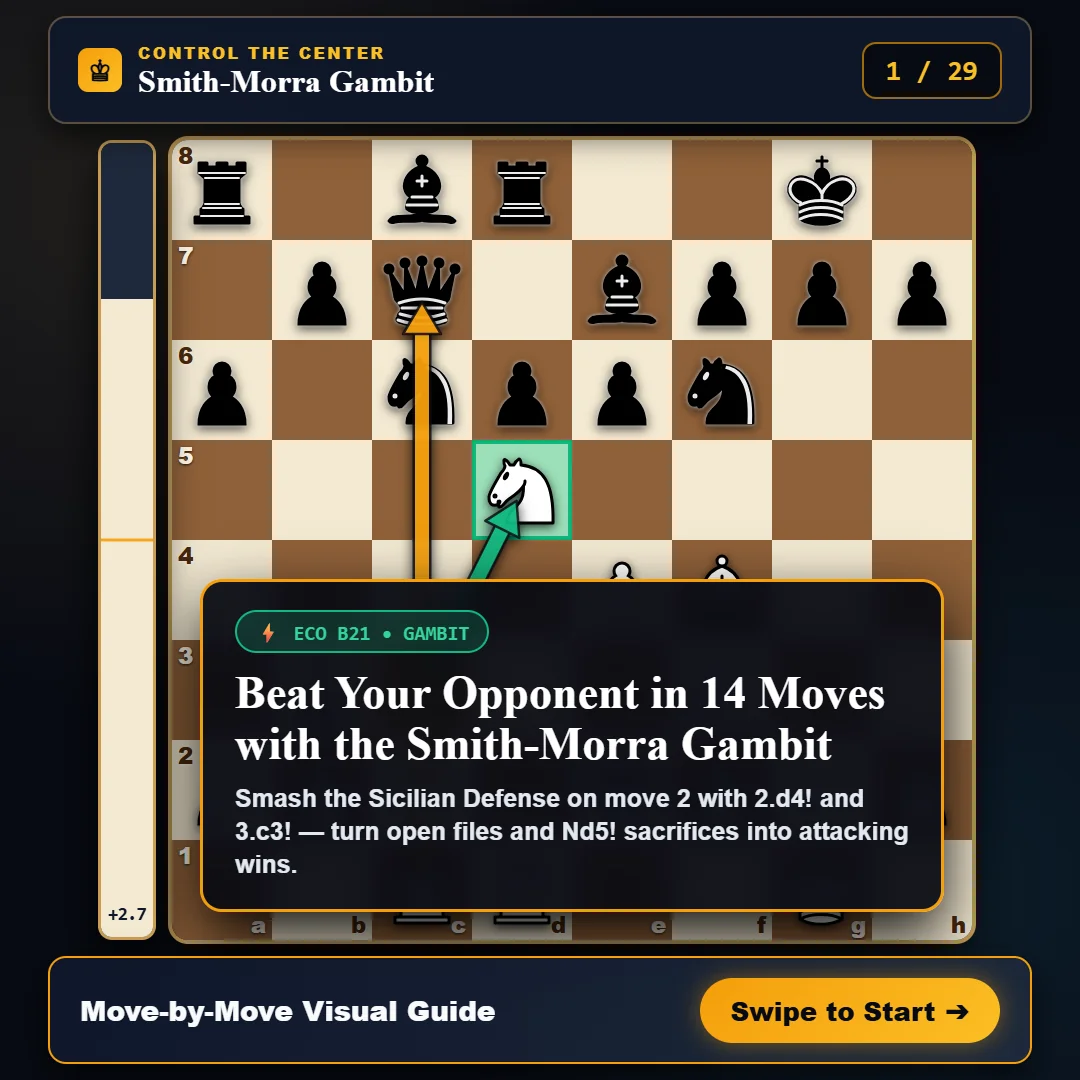
Smith-Morra Gambit move 3.c3 diagram — sacrificing the c3 pawn against the Sicilian Defense
Slide 1 / 29
Jump to Key Turning Points Click any card to inspect

Tip: Use the ← Prev / Next → buttons (or swipe on mobile) to walk through all 29 slides on demand.


Stockfish 18 Evaluation & Club Win-Rate Comparison

Inspect how Stockfish 18 (NNUE Depth 36) evaluates both Accepted Morra fireworks and Black’s safest Declined replies:

Variation / BranchExact ContinuationStockfish 18 EvalClub Score (W / D / B)Assessment
Classical Nd5! Attack (12.Bb3 13.Nd5!)8.Qe2 Nf6 9.Rd1 Qc7 10.Bf4 Be7 11.Rac1 O-O 12.Bb3 Rd8 13.Nd5!-0.1058% / 4% / 38%Golden Morra Attack: Full compensation with blistering c- and e-file tactics.
Overclock’s Antidote (9.Nb5!)6...Qc7 7.O-O Nf6 8.Qe2 Ng4 9.Nb5! Qb8 10.h3 Nge5+0.1559% / 5% / 36%Stops Siberian Cold: Breaks Black’s Qc7-h2 battery before touching h3.
Siberian Trap (9.h3?? Nd4!)6...Qc7 7.O-O Nf6 8.Qe2 Ng4! 9.h3?? Nd4! 10.Nxd4?? Qh2#-M25% / 0% / 95%Deadly Autopilot Trap: Punishes automatic 9.h3?? in 10–11 moves.
Premature Pin Trap (6...Bg4?)4...d6 5.Nf3 Nc6 6.Bc4 Bg4? 7.Bxf7+! Kxf7 8.Ng5+ Ke8 9.Qxg4+0.8567% / 4% / 29%Legal’s-Style Deflection: Wins back the pawn with a stranded Black king.
Center Break Trap (9...O-O? 10.e5!)6...e6 7.O-O Nf6 8.Qe2 Be7 9.Rd1 O-O? 10.e5! Ne8 11.exd6+1.4068% / 3% / 29%d-File Bind: Rd1 paralyzes d6 and leaves Black’s pieces tangled.
Declined (3...Nf6 4.e5 Nd5)3...Nf6 4.e5 Nd5 5.Nf3 Nc6 6.Bc4 Nb6 7.Bb3 d5 8.exd6 Qxd6+0.1053% / 8% / 39%Alapin Transposition: Solid, active structure if Black declines the pawn.
Declined (3...d5 4.exd5 Qxd5)3...d5 4.exd5 Qxd5 5.cxd4 Nc6 6.Nf3 Bg4 7.Be2 e6 8.Nc30.0051% / 8% / 41%Balanced IQP Battle: White gets smooth Nc3 tempo and piece activity.

Deadly Move-Order Traps & Overclock’s Post-Show Hijack

1. The Siberian Trap (8...Ng4! 9.h3?? Nd4!) — Why Autopilot Gets You Mated

As featured in our @Control_The_Center YouTube Short, the single biggest danger for Smith-Morra players isn’t Black’s solid theory—it’s playing the natural-looking 9.h3?? on autopilot! Once Black lines up 6...Qc7, 7...Nf6, and 8...Ng4!:

  • 9.h3?? immediately drops to 9...Nd4!, hitting White’s queen on e2 while trying to eliminate White’s ONLY defender of h2 (Nf3).
  • Grabbing 10.Nxd4?? allows instant 10...Qh2# checkmate! Even retreating 10.Qd1 gets crushed by 10...Nxf3+! 11.Qxf3 Qh2#.

2. How 9.Nb5! Shuts Down the Siberian Ambush Completely

The antidote Overclock showed takes just one move of alert tactics: instead of chasing the g4-knight first, immediately leap 9.Nb5!, attacking Black’s queen on c7. Because 9...Qb8 is forced to save the queen and defend d6/a7, Black’s battery onto h2 vanishes—so 10.h3! now kicks Ng4 cleanly on the very next turn.

3. Don’t Miss White’s Signature Weapon: Nd5!

Once you safely reach middle-game harmony (Bc4, O-O, Qe2, Rd1, Bf4, Rac1), always scan for Nd5!. Against both Van Wely and D. Gukesh, putting the c3-knight right into the heart of ...e6 ripped open the c-file and e-file at the exact moment Black thought their fortress was complete.


Practical Interactive Practice & Puzzles

Drill every attack, queen battery defense, and Nd5! breakthrough before facing the Sicilian next:

For experienced players

“The Smith-Morra Gambit teaches tactical vision faster than almost any 1.e4 weapon: you learn open files, knight sacrifices on d5, and why move-order awareness like 9.Nb5! beats playing opening patterns on autopilot.” — Travis Carney, Control The Center (USCF #A953841)

See also:Sicilian Defense·Evans Gambit·Italian Game·Alien Gambit·Sacrifice·Discovered attack·Tempo·Open Files

Frequently Asked Questions (Smith-Morra Gambit)

Is the Smith-Morra Gambit an official chess opening?

Yes. The Smith-Morra Gambit (1.e4 c5 2.d4 cxd4 3.c3) is classified under ECO B21 across every FIDE database and chess platform, developed independently by Pierre Morra in 1950 and IM Ken Smith in the 1960s.

How do you play the Smith-Morra Gambit step by step?

Meet 1.e4 c5 with 2.d4 cxd4 3.c3! dxc3 4.Nxc3. Next develop cleanly with Nf3, Bc4, O-O, Qe2, Rd1, Bf4 (or Bg5), and Rac1, staring right down the half-open c- and d-files while setting up e5! or Nd5! breakthroughs.

What is the Siberian Trap in the Smith-Morra Gambit?

The Siberian Trap happens after 4.Nxc3 Nc6 5.Nf3 e6 6.Bc4 Qc7 7.O-O Nf6 8.Qe2 Ng4!. If White plays 9.h3?? on autopilot to kick the knight, Black springs 9...Nd4! forking White's queen and the f3-knight defending h2. Taking 10.Nxd4?? walks into 10...Qh2#.

How do you avoid or stop the Siberian Trap as White?

Against 8...Ng4!, do NOT play 9.h3?? immediately. Play 9.Nb5! first, attacking Black's queen on c7 with tempo. Once Black retreats with 9...Qb8 (losing control over h2 and covering b8), White safely plays 10.h3! Nge5 11.Nxe5 Nxe5 12.Bb3 with full compensation.

Is the Smith-Morra Gambit sound against masters?

Stockfish 18 evaluates Accepted lines around -0.25 to -0.45 against top grandmaster defense, well within practical margin. IM Marc Esserman has beaten multiple 2600+ grandmasters—including Loek van Wely and World Champion D. Gukesh—using the accepted Smith-Morra.

Why does Black score well by declining with 3...Nf6?

Declining via 3...Nf6 4.e5 Nd5 transposes straight into an Alapin Sicilian (2.c3) where White scores strongly but faces solid central counterplay instead of open Morra attacks. Knowing both Accepted traps and the 3...Nf6 Alapin line makes White's repertoire complete.

What is the best piece sacrifice in the Smith-Morra Gambit?

The signature Nd5! sacrifice (typically after ...Qc7, ...Be7, Rac1, and ...O-O) is White's deadliest motif. Capturing 13...exd5 14.exd5 traps Black's c6-knight in front of its own queen on the open c-file while launching discovered attacks down the e- and d-files.

Should I play the Smith-Morra against the 2...e6 or 2...d6 Sicilian?

Yes—because White plays 2.d4 immediately on move 2 before Black ever chooses 2...d6, 2...Nc6, or 2...e6. If Black refuses 2...cxd4 (such as 2...e6), White plays 3.Nf3 or 3.c3 with an easy central edge, which is why over 95% of Sicilian players capture 2...cxd4.

60 Verified Puzzles Free Interactive Pack

Master Smith-Morra Gambit Tactics & Calculations

Drill 60 curated Smith-Morra Gambit traps, critical tactical forks, and middlegame sacrifices with instant Stockfish board evaluation and refutations.

Solve 60 Smith-Morra Gambit Puzzles

Famous Games

Marc Esserman vs Loek van Wely

World Open, Philadelphia, 2011

Mayhem on the c-file—Marc Esserman detonates 13.Nd5! against 2680+ GM Loek van Wely and follows up with 19.Bxf7+! and 22.Rd8+! to topple a seven-time Dutch Champion.

PGN Game Record for Marc Esserman vs Loek van Wely
[Event "World Open"]
[Site "Philadelphia USA"]
[Date "2011.07.03"]
[Round "7"]
[White "Esserman, Marc"]
[Black "Van Wely, Loek"]
[Result "1-0"]
[ECO "B21"]

1. e4 c5 2. d4 cxd4 3. c3 dxc3 4. Nxc3 Nc6 5. Nf3 d6 6. Bc4 e6 7. O-O Be7 8. Qe2 a6 9. Rd1 b5 10. Bb3 Ra7 11. Be3 Rd7 12. Rac1 Bb7 13. Nd5 exd5 14. exd5 Ne5 15. Nxe5 dxe5 16. Bb6 Qb8 17. Qg4 g6 18. d6 Bxd6 19. Bxf7+ Rxf7 20. Qe6+ Be7 21. Bc7 Qa8 22. Rd8+ Qxd8 23. Bxd8 Kxd8 24. Qxf7 1-0

Marc Esserman vs D. Gukesh

Cannes Chess Festival, 2017

Future World Champion D. Gukesh puts the Morra to a concrete kingside test—only for Esserman's 11.Nd5! exd5 12.exd5 Nce5 13.d6! pawn torpedo to smash through.

PGN Game Record for Marc Esserman vs D. Gukesh
[Event "Cannes Open"]
[Site "Cannes FRA"]
[Date "2017.02.25"]
[Round "8"]
[White "Esserman, Marc"]
[Black "Gukesh, D"]
[Result "1-0"]
[ECO "B21"]

1. e4 c5 2. d4 cxd4 3. c3 dxc3 4. Nxc3 e6 5. Nf3 Nc6 6. Bc4 a6 7. O-O Nge7 8. Bg5 f6 9. Be3 Ng6 10. Bb3 b5 11. Nd5 exd5 12. exd5 Nce5 13. d6 Bb7 14. Nxe5 fxe5 15. f4 exf4 16. Re1 fxe3 17. Rxe3+ Be7 18. Qd4 Qb8 19. dxe7 Qa7 20. Bf7+ Kxf7 21. e8=Q+ Rhxe8 22. Rf1+ Kg8 23. Rxe8+ Rxe8 24. Qxa7 Bc6 25. Qxa6 h6 26. Qa5 Re2 27. Rf2 Re6 28. Qc3 Re4 29. Qd2 Ne5 30. Re2 Nc4 31. Qd1 Rf4 32. Re8+ Kf7 33. Qh5+ g6 34. Qe2 1-0

Siberian Trap Showcase vs Classic Black Ambush

Theoretical 10-Move Refutation, 1990

The textbook trap shown in our YouTube Short: autopiloting 9.h3?? gets crushed immediately by 9...Nd4! 10.Nxd4?? Qh2#.

PGN Game Record for Siberian Trap Showcase vs Classic Black Ambush
[Event "Siberian Trap Illustration"]
[Site "Control The Center Theory"]
[Date "1990.01.01"]
[White "Autopilot Player"]
[Black "Siberian Specialist"]
[Result "0-1"]
[ECO "B21"]

1. e4 c5 2. d4 cxd4 3. c3 dxc3 4. Nxc3 Nc6 5. Nf3 e6 6. Bc4 Qc7 7. O-O Nf6 8. Qe2 Ng4 9. h3 Nd4 10. Nxd4 Qh2# 0-1
Graffiti Spray Can Aerosol Badge Control The Center Collector Studio • ECO B21 (e4 c5 d4 cxd4 c3 dxc3)

Collect the Smith-Morra Gambit Generative Art & Tournament Gear

Every move of the Smith-Morra Gambit generates a unique geometric vector signature. Explore museum-grade chess canvas prints, heavyweight repertoire streetwear, and USCF-regulation 2.25″ silicone study boards at ControlTheCenter.com.

Google Preferred Source

Follow Smith-Morra Gambit & Opening Theory on Google

Add Control The Center as a preferred source on Google to see our interactive opening guides, Stockfish analysis, and tactical puzzles highlighted in Google Search.